Without completing this step, the phishing simulation emails will likely be held in the Microsoft 365 Quarantine and must be manually released. At the same time, it's also important not to undermine Microsoft 365's inbuilt security features, which could allow an attacker to spoof the domain names used by our phishing simulator.
The objectives of this guide are as follows:
-
Ensure that Exchange Online Protection and Microsoft Defender take no action for Secure Schools Phishing Simulations
-
Zero-hour Purge take no action for Secure Schools Phishing Simulations
-
Safe Links and Safe Attachments features do not "fire" the attachments or links in phishing simulation emails and, therefore, reduce the likelihood of a false positive
-
Keep SPF, DKIM and DMARC controls in place
-
Keep malware controls in place
With the above in mind, we have prepared step-by-step instructions for allowing Secure Schools Phishing Simulation emails through the Office 365 filters while maintaining SPF, DKIM and DMARC controls adopted from Microsoft's guide for configuring the delivery of third-party phishing simulations.
If you have any questions or concerns about this guide, please comment here or use the help link at the top of this page. One of our team members will be happy to help.
Step 1
Log in to Microsoft 365 Defender with an account that has the Security Administrator and a member of the Organization Management role group. A global administrator would have these privileges by default.
Step 2
Navigate to Policies & Rules > Threat Policies > Advanced Delivery, then click on the Phishing Simulation tab.

Step 3
Click the Edit button to access the Third Party Phishing Simulations options.
Step 4
In the Third Party Phishing Simulations options pane, enter the Secure Schools' Phishing Simulator details:
Sending Domains:
-
emaildistributionhub.co.uk
-
notificationdistributionhub.co.uk
-
emaildistributionhub.com
-
notificationdistributionhub.com
-
emaildispersalhub.co.uk
-
emaildispersalhub.com
-
maildispersalhub.com
-
notificationdispersalhub.co.uk
-
notificationdispersalhub.com
Please note that the above list is regularly updated and may include additional domains not included in the screenshots
Sending IP:
- 185.250.239.80

Congratulations, your school or trust's Office 365 tenancy has been configured to receive phishing simulation emails safely!
Under most configurations, whitelisting our phishing simulation platform hostnames and IP addresses will be enough to allow the simulation emails to arrive in the user’s inbox. However, under some setups, you may need to whitelist by email header to ensure the phishing simulation emails are delivered correctly.
How to configure bypassing spam filtering by mail header in Microsoft 365
To bypass spam filtering by email header:
- Log into the Microsoft 365 Exchange Admin Centre
- Navigate to Mail flow and select Rules
- Select Add a rule, then either select "Bypass spam filtering" if it already exists OR select "Create a new rule" if it doesn't
 Or - New rule
- For a new rule, enter a suitable rule name

- From the Apply this rule if option, select The message headers…
- In this same section, select includes any of these words
- Under the Apply this rule if section, click Enter text to specify the header name:
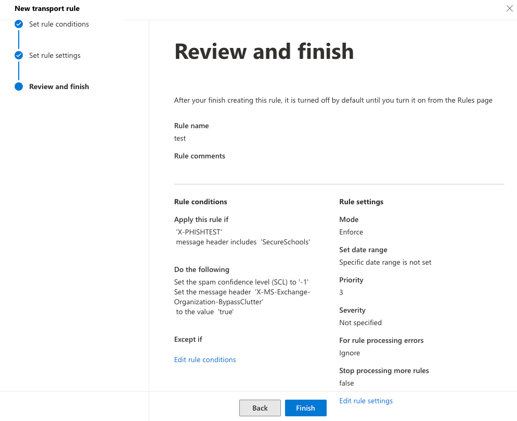
X-PHISHTEST - Select Save
- Select Enter words and enter SecureSchools
- Select Add and then Save

- Under the Do the following section, make sure the options are set to:
- Modify the message properties
- Set the spam confidence level (SCL)
- Set the spam confidence level (SCL) is set to -1

- In the same section, add a second action by clicking the + icon to the right of the drop-down menu.
- In the And section, select Modify the message properties
- In the same section, select Set a message header
- Click the lefthand Enter text option and enter X-MS-Exchange-Organization-BypassClutter.
- Select Save
- Select Enter text and enter true

- Review all settings and click Next.
- Set the Rule mode to Enforce and then click Next
- Review all settings and select Finish